To send WooCommerce orders to an AI workflow, create a webhook in WooCommerce under Settings, Advanced, Webhooks with the topic set to order creation, then point its Delivery URL at a Webhook trigger inside AI Workflow Automation, a free WordPress plugin. Each new order then lands in a workflow that can read it, classify it, and decide what happens next, all inside the same WordPress install.
AI Workflow Automation is a free WordPress plugin with a visual drag-and-drop builder that runs AI workflows, agents, and chatbots inside your own site, using your own API keys, with no external subscription required.
WooCommerce already sends you an order email, and a general automation platform can also catch this same webhook and forward it somewhere. What neither one does on its own is look at what is in the order and decide something: whether it is worth a phone call, whether the shipping address looks wrong, or whether it should skip the queue. That decision is what an AI Model step adds once the order lands inside a workflow.
What is a WooCommerce order webhook?
A WooCommerce order webhook is a message WooCommerce sends automatically to a URL you specify the moment a matching order event happens, most often a new order being placed. You create one under Settings, Advanced, Webhooks, where you pick a Topic, paste in a Delivery URL, and set a Secret that WooCommerce uses to sign each delivery, as WooCommerce’s webhooks documentation explains.
WooCommerce also fires webhooks for other order events, order status changes, deletions, restores, so the same pattern covers more than just new orders once you have it set up once.
Why send an order to an AI workflow instead of just an email notification?
An order email tells you an order happened. An AI workflow can also read what is inside it, the items, the total, the shipping country, any note the customer left, and decide something from that. It can flag a large or unusual order for a human to check, or summarise a wholesale order into one line for your operations channel.
General automation platforms can catch this same webhook, but the order data then has to leave WordPress to reach them, and you are usually paying for a second account to move it along. Keeping the whole path, receiving the webhook, running the AI step, and acting on the result, inside the plugin means the order never has to leave your own server unless you choose Cloud mode for that particular workflow. See Local vs Cloud execution for how that choice works.
How do you create the webhook in WooCommerce?
You create a WooCommerce order webhook from wp-admin, without any code. WooCommerce Settings has a dedicated Webhooks screen where you name the webhook, pick which order event fires it, and paste in the URL that should receive it. The steps below assume you already have that receiving URL, which comes from the Webhook trigger inside your AI workflow, covered next.
- In wp-admin, go to WooCommerce, Settings, Advanced, Webhooks, and click Add webhook.
- Give it a name you will recognise later, for example “New order to AI workflow.”
- Set Status to Active.
- Set Topic to the order-created event, so it fires only when a new order is placed.
- Paste the Webhook trigger URL from AI Workflow Automation into Delivery URL.
- Leave a Secret in place (WooCommerce generates one) and save.
Saving an active webhook does one more useful thing. As WooCommerce’s documentation puts it, “The first time you save a webhook with the Active status, WooCommerce sends a ping to the Delivery URL.” That first ping confirms the URL is reachable, though it will not yet carry order data.
How do you build the workflow that receives the order?
The workflow side takes four building blocks: a Webhook trigger to receive the order, an AI Model node to read it, a Condition node to branch on what the model decided, and an action node to act on each branch. Add your OpenAI or OpenRouter key in Settings first if you have not already, since Local mode runs on your own key at no cost in plugin credits.
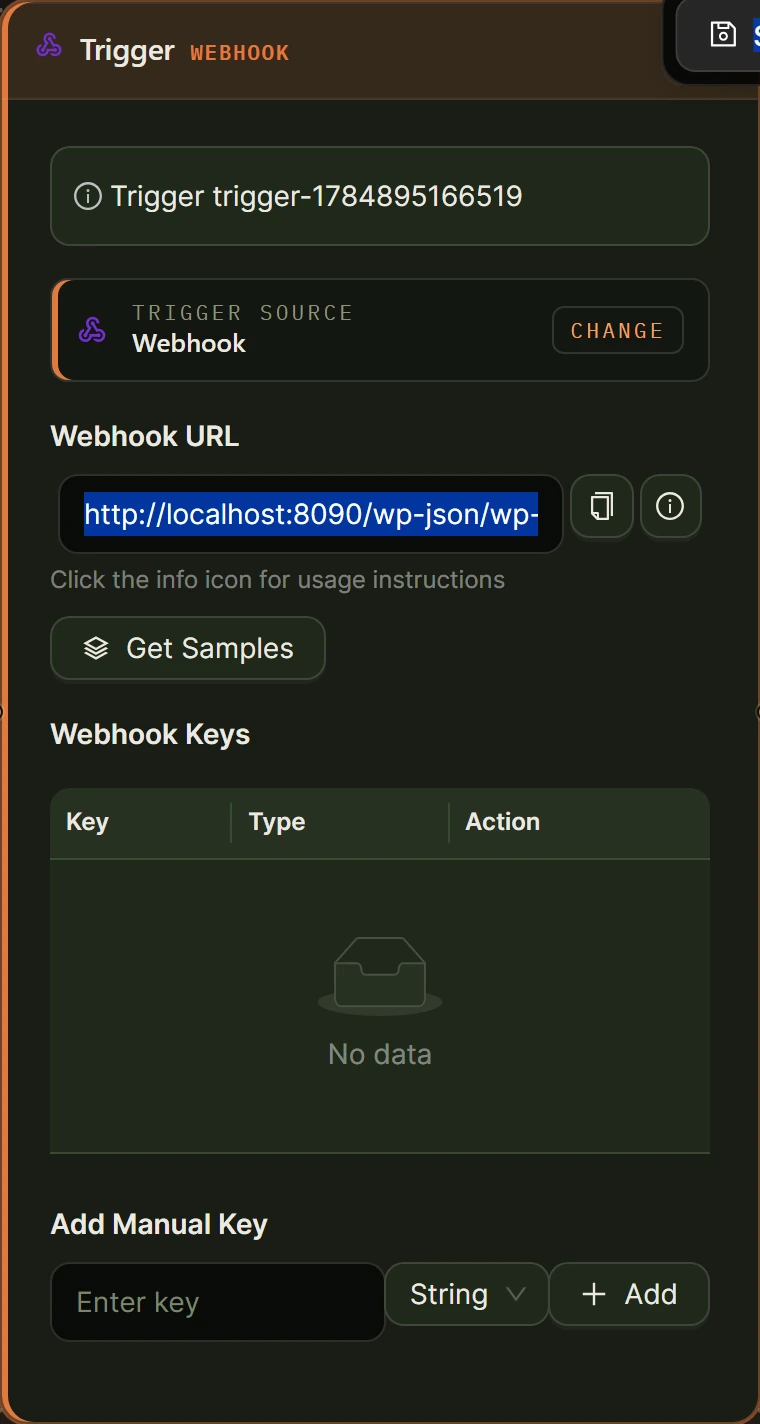
- Create a new workflow and add a Trigger node. Choose Webhook from the External group, then copy the Webhook URL the node generates. This is the Delivery URL you pasted into WooCommerce.
- Place one real test order in your store, then click Get Samples on the Webhook trigger node so it reads the keys from that payload.
- Add an AI Model node and connect it to the trigger. In the Prompt box, write something like: “Look at this WooCommerce order and say whether it needs manual review before it ships: [Input from trigger-1]. Reply with a single word, either review or standard, then one short reason.”
- Add a Condition node and connect it to the AI Model node. Set one condition: input [Input from ai-1], comparison contains, value review.
- Wire the true handle to a Send Email node addressed to whoever checks flagged orders, with the body set to [Input from ai-1] so they see the reason. Wire the false handle to a second Send Email node, or leave it unconnected if standard orders need no message.
- Save the workflow, then click Run to test it against the sample payload from step two before you rely on it against real traffic.
If you would rather send the flagged-order alert to Slack than to an inbox, wire the true branch to a Connect an App step instead of a Send Email node. We cover that setup in AI Slack alerts from WordPress.
How do you test the webhook before it goes live?
Test a WooCommerce order webhook the same way you would test any integration: with a real event, watched closely, before you trust it unattended. Place a genuine test order in your store, then open the workflow’s live execution panel to watch the Webhook trigger, AI Model, and Condition nodes fire in sequence with their real inputs and outputs.
WooCommerce keeps its own record of every delivery attempt too, under Status, Logs, filtered to the webhook delivery log, so you can check the response your site sent back if an order does not seem to have arrived. On the receiving side, the plugin’s Webhook trigger does not check WooCommerce’s signature, so the unique Webhook URL is what keeps other senders out: treat it like a password and never publish it. OWASP’s REST security cheat sheet puts the underlying principle plainly: “Do not trust input parameters/objects.” That is also why this workflow only classifies and alerts. Keep refunds, cancellations and anything that changes an order with a person, and do not point a production Delivery URL at a workflow you have not run at least once against a sample order.
How many credits does this workflow cost?
In Local mode, this workflow costs no plugin credits at all: you pay only your AI provider’s own per-token price for the AI Model call, the same as calling that provider directly. Switch the workflow to Cloud mode and the Webhook trigger, Condition node, and Send Email step still cost nothing, because only the AI Model node is a paid step, at 2 credits, on top of the 1 base credit every Cloud run charges.
| Node | Where it runs | Cloud credits |
|---|---|---|
| Webhook trigger | Cloud, or your site in Local mode | 0 |
| AI Model | Cloud, or Local with your own key | 2 |
| Condition | Cloud, or your site in Local mode | 0 |
| Send Email | Always your own site’s mailer | 0 |
A new account starts with 50 free credits, which at roughly 3 credits per run is enough to test this exact workflow about sixteen times in Cloud mode before you need to think about a plan or a top-up.
Frequently asked questions
What data does a WooCommerce order webhook send?
A WooCommerce order webhook posts the order as JSON to your Delivery URL: the order ID and status, the total and currency, billing and shipping details, and each line item with its product, quantity, and price. Inside AI Workflow Automation, click Get Samples on the Webhook trigger after a real order arrives, and every one of those keys becomes a value you can reference by name in the rest of the workflow.
Do WooCommerce webhooks fire immediately?
Not in the same request that creates the order. WooCommerce queues the delivery and sends it shortly afterward, normally within seconds, but delivery depends on WP-Cron running on your site. A very quiet store, with little other traffic to trigger WP-Cron, can see a short delay before the webhook actually goes out.
Do I need an account or a paid plan to use this?
No. The Webhook trigger, AI Model node, Condition node, and Send Email node all run for free in Local mode with your own OpenAI or OpenRouter key, and that needs no account at all. An account is only needed if you switch the workflow to Cloud mode, and it stays free unless you choose to buy credits.
What if the AI Model node gets the classification wrong?
Treat the first weeks as supervised, not automated. Watch a handful of real orders go through the live execution panel, read what the AI Model node actually returned, and adjust the prompt where it is too cautious or not cautious enough. Because the Condition node checks for a specific word in the response, a small prompt change is usually enough to fix a wrong branch.
Can I react to other order events, not just new orders?
Yes. WooCommerce’s Topic list also covers events such as an order being updated, deleted, or restored, and you can add a second webhook, pointed at a second Webhook trigger, for any of them. A common pairing is a webhook on order creation for the classification workflow described here, and a separate webhook on order status change to tell a customer when their order ships.
Install AI Workflow Automation free from the WordPress plugin directory, and see more ways to automate a WooCommerce store on the e-commerce automation page.