A webhook is an automatic message one app sends another the instant an event happens, carrying a data payload to a URL you define. In WordPress you can both send and receive webhooks without code: AI Workflow Automation, a free WordPress plugin, provides a webhook trigger to start a workflow and a webhook output to push data anywhere, connecting WordPress to any external service.
I am Navid, the developer of that plugin, and webhooks are the single most common thing people email me about. AI Workflow Automation is a free WordPress plugin with a visual drag-and-drop builder that runs AI workflows, agents, and chatbots inside your own site, using your own API keys, with no external subscription required.
What is a webhook, in plain terms?
A webhook is a one-way HTTP request that an app fires the moment something happens, delivering a small data packet (almost always JSON) to a URL you gave it in advance. Nothing polls, nothing waits. If a payment succeeds at 14:02:11, the webhook usually lands on your server by 14:02:12.
People often call a webhook a “reverse API.” With a normal API you ask a question and get an answer. With a webhook you register an address once and the other system talks to you, unprompted, forever after. Per MDN’s reference on the HTTP POST method, “the POST HTTP method sends data to the server. The type of the body of the request is indicated by the Content-Type header.” A webhook is that, sent automatically instead of by a person clicking submit.
How are webhooks different from APIs?
The difference is who starts the conversation and when. A webhook is pushed to you by the other system on its schedule of events. An API call is pulled by you, on your schedule, when you decide you want data. Most real automations use both: a webhook wakes the workflow up, then API calls fetch the extra details the payload did not include.
| Aspect | Webhook | API call |
|---|---|---|
| Who starts it | The other app, automatically | You, on demand |
| Timing | Within seconds of the event | Whenever you run the request |
| Typical method | POST with a JSON body | GET, POST, PUT, PATCH, DELETE |
| Best for | “Tell me the moment X happens” | “Give me the current state of X” |
| Main failure mode | Delivery missed if your endpoint is down | Rate limits and stale data between polls |
How do you receive a webhook to trigger a WordPress workflow?
To receive a webhook in WordPress, you add a Trigger node, choose Webhook from the External group, and the plugin generates a unique inbound URL for that node. Any external service that can POST JSON to a URL can then start your workflow. There is no PHP to write and no endpoint to register by hand.
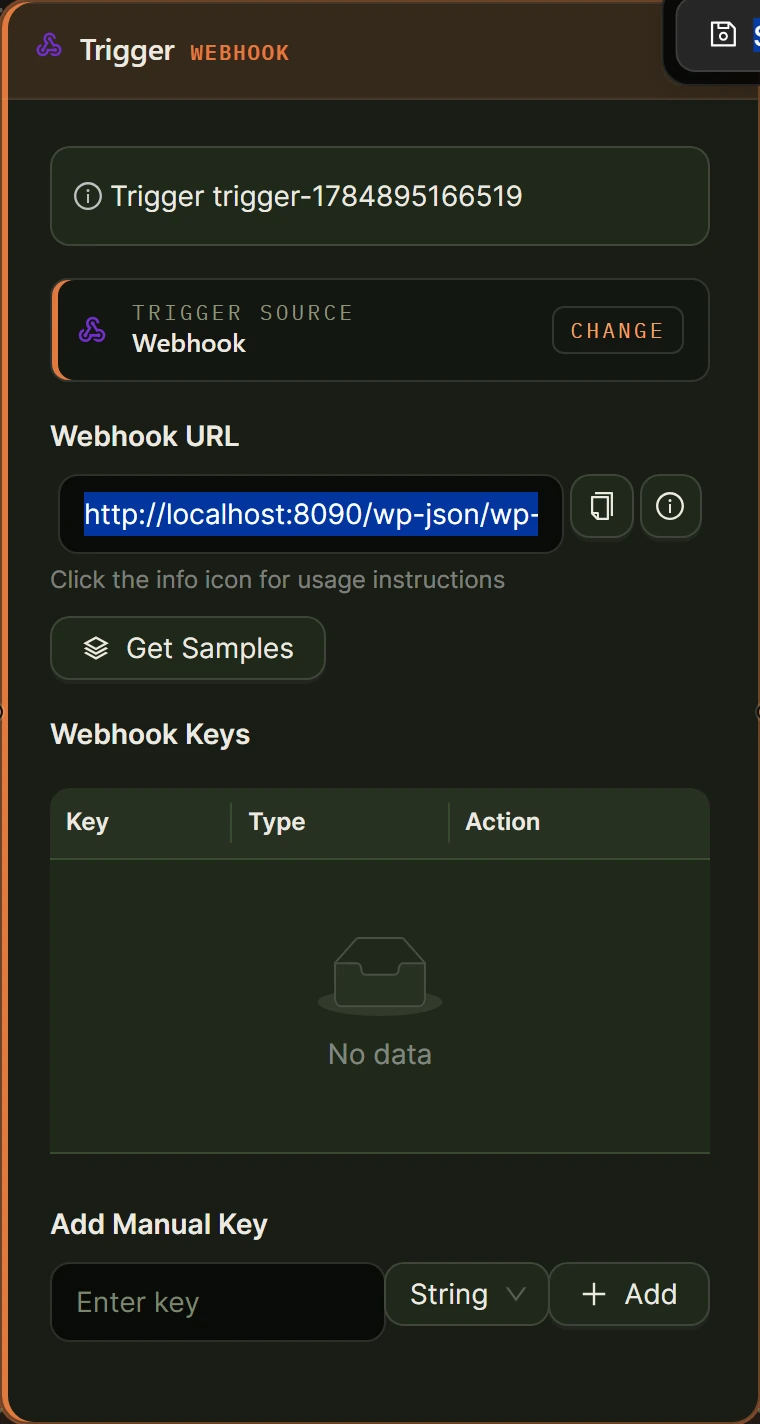
- Open AI Workflows in your WordPress admin menu and create a new workflow.
- Drag a Trigger node onto the canvas and pick Webhook from the External group.
- The node generates a Webhook URL automatically. It looks like
https://yoursite.com/wp-json/wp-ai-workflows/v1/webhook/trigger-1?key=aB3xK9pQ2LmZ, where thekeyvalue is a random 12-character token unique to that node. - Use the copy button next to the field, then paste the URL into the sending app’s webhook settings.
- Fire one real test event from that app so a genuine payload reaches WordPress.
- Click Get Samples. The node reads the payload it just received and turns every key it finds into a named field you can reference downstream.
- If the sending app cannot produce a test payload, use Add Manual Key to define field names yourself and set each one as a string, number, or boolean.
- Connect the trigger to whatever should happen next: an AI Model node, a Condition node, a Create Post node.
Downstream nodes read the payload with variable tags. [[user_email] from trigger-1] pulls one named field, and [Input from trigger-1] passes the whole payload through. The builder displays these as friendly pills, so you pick fields from a list instead of typing brackets. The syntax is documented in the guide to data flow and variable handling, and the trigger itself in the Webhook Trigger docs.
One honest caveat: inbound webhooks run through your site’s PHP, so a long workflow can hit your host’s execution limit. They are most reliable in Cloud mode, where there is no PHP timeout.
How do you send a webhook out to another service?
To send a webhook from WordPress, you end the workflow with an Output node set to Send to Webhook, paste the destination URL, and map the fields you want to transmit. AI Workflow Automation builds the JSON body for you from a key-value grid, so you never hand-write a payload or a wp_remote_post() call.
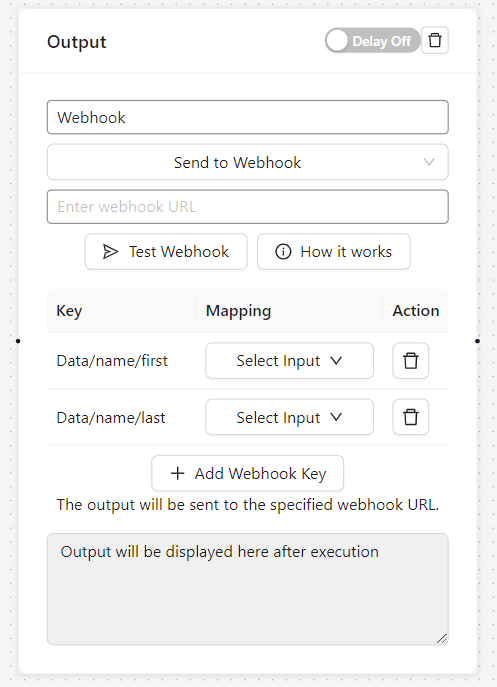
- Drag an Output node onto the canvas, connect it to the last step, and choose the Send to Webhook output type.
- Paste the destination URL from the receiving service into the webhook URL field.
- Build the payload in the Data Mapping grid: one row per key, with a value that can be static text or a variable tag from any upstream node.
- Use a forward slash in a key name to nest it. A key called
user/emailproduces{"user":{"email":"..."}}in the JSON body. - Set the data type per row (string, number, boolean, or null), and add custom headers if the destination needs an auth token.
- Hit the test button and confirm the payload arrived in the shape the other service expects.
When you need more than fire-and-forget, use the API Call node instead. It lets you pick the method (GET, POST, PUT, DELETE, PATCH, HEAD, OPTIONS), choose an auth type (None, Basic Auth, Bearer Token, or API Key), set a Retry Count from 0 to 5, and set a timeout in milliseconds. Critically, it hands the response back: [[status] from apiCall-1] gives you the HTTP status code and [[data] from apiCall-1] the parsed body, so the next node can branch on whether the call actually worked. Full payload-builder details are in the Webhook Output documentation.
What does a full no-code webhook walkthrough look like?
Here is a complete round trip: an external form tool posts a lead into WordPress, AI qualifies it, and WordPress posts the result out to a CRM. About fifteen minutes, no code.
- Add a Trigger node set to Webhook and copy the generated URL into the form tool’s webhook setting.
- Submit one real test entry, then click Get Samples so fields like
name,email, andmessagebecome referenceable. - Add an AI Model node prompted to score the lead from 1 to 5 with a one-line reason, reading
[[message] from trigger-1], with structured output on so it returns namedscoreandreasonfields. - Add a Condition node that continues only when the score is 4 or higher.
- Add an Output node set to Send to Webhook, pointed at the CRM’s inbound URL, mapping
contact/emailto[[email] from trigger-1]andlead/scoreto[[score] from aiModel-1]. - Run it once from the builder, check the output, then save and activate.
The same shape works for order events, membership signups, support tickets, and calendar bookings. Only the trigger source and the destination change.
How do you secure a WordPress webhook?
Treat an inbound webhook URL exactly like a password: anyone who has it can start your workflow. The plugin authenticates inbound calls with a random key token embedded in the generated URL, so the security of that endpoint is the security of that URL. These six rules cover the realistic risks.
- Serve everything over HTTPS. A webhook URL sent over plain HTTP exposes its key token to anyone on the network path.
- Never paste the URL anywhere public. No screenshots, no forum posts, no public repositories. I have seen live endpoints leak all three ways.
- Regenerate the URL if it leaks. Deleting and re-adding the Webhook trigger issues a fresh key and kills the old one.
- Validate the payload before acting on it. Put a Condition node right after the trigger that checks a shared secret field the sender includes in its body, and stop the workflow when it does not match.
- Never let a webhook payload publish live content on its own. Write to draft, or route through a Human Input node.
- Verify signatures when the sender offers them. GitHub, for example, sends an
X-Hub-Signature-256header generated with HMAC-SHA256 from your secret and the payload body, and its documentation on validating webhook deliveries warns you to compare it with a constant-time function and “never use a plain == operator.”
Being straight about the limitation: the Webhook trigger checks the key in the URL, it does not compute an HMAC signature check for you. For payloads carrying money or personal data, rule 4 is the practical no-code approximation and a signed check in custom code is still stronger.
What are the most common WordPress webhook use cases?
These are the patterns I see most often in real AI Workflow Automation installs, in rough order of frequency.
- External form to WordPress. A form tool that is not a WordPress plugin posts entries in, and a workflow files, summarizes, or replies to them.
- Payment or subscription events. A checkout provider fires on payment success, and the workflow provisions access or drafts a welcome email.
- WordPress to chat. A new order or high-value lead triggers an outbound webhook that posts an AI-written summary into Slack or Discord.
- WordPress to CRM or spreadsheet. Qualified leads are pushed out to HubSpot, Pipedrive, or a Google Sheet without an intermediary service.
Frequently asked questions about WordPress webhooks
Does WordPress support webhooks out of the box?
No. WordPress core has no webhook feature. It ships a REST API you can call, and it has action hooks in PHP, but nothing that receives an inbound webhook or sends an outbound one without code. A plugin has to provide the endpoint. AI Workflow Automation adds both directions: a Webhook trigger to receive and a webhook output to send.
How do I get a webhook URL in WordPress?
Add a Trigger node to a workflow in AI Workflow Automation and select Webhook from the External group. The plugin immediately generates a unique inbound URL in the form https://yoursite.com/wp-json/wp-ai-workflows/v1/webhook/trigger-1?key=RANDOMTOKEN. Copy it with the button beside the field and paste it into the sending service. No URL exists until you add the trigger node.
Are WordPress webhooks secure?
They are as secure as the URL you keep private. The inbound endpoint is protected by a random key token in the URL, so serve it over HTTPS, never publish it, and regenerate it if it leaks. Add a Condition node that checks a shared secret in the payload before the workflow acts, and never let inbound data publish content directly.
Do I need Zapier to use webhooks with WordPress?
No. Zapier is a relay between two services, and if WordPress can receive and send webhooks itself, the relay is unnecessary for most jobs. AI Workflow Automation runs the whole path inside your own site: it accepts the inbound webhook, processes it with AI or logic nodes, and posts the result out. You still need Zapier only when the other app speaks no webhooks at all.
Start sending and receiving webhooks today
Webhooks are the cheapest way to make WordPress part of a real automation stack, and none of it requires code. Install AI Workflow Automation from the WordPress plugin directory, drop a Trigger node on the canvas, and you will have a working inbound URL in under a minute. To push data back out, the webhook output documentation walks through the payload builder field by field.