To automate content creation in WordPress with AI, you chain the steps of research, writing, image generation, SEO, and publishing into one workflow. AI Workflow Automation, a free WordPress plugin, connects these stages visually inside your dashboard, so a single trigger can research a topic, draft the article, add an image, optimize it, and queue it for review.
I build this pipeline for a living. I am Navid, the developer of the plugin, and what follows is the version I actually run, including the parts I deliberately leave manual. AI Workflow Automation is a free WordPress plugin with a visual drag-and-drop builder that runs AI workflows, agents, and chatbots inside your own site, using your own API keys, with no external subscription required.
The adoption numbers are worth knowing before you start. In the Content Marketing Institute’s B2B Content and Marketing Trends: Insights for 2026 research, 95% of B2B marketers say their organizations use AI-powered applications and 89% of those use AI for content creation, yet only 39% report improved content performance. Adoption is nearly universal. Results are not. The gap is almost always process, not model choice.
What does an end-to-end AI content pipeline look like?
An end-to-end AI content pipeline is a single workflow that moves a topic through five stages without you touching it: research, draft, illustrate, optimize, and publish as a draft for review. In AI Workflow Automation each stage is one node on a canvas, connected left to right, and each node passes its output to the next through a variable tag.
The critical design decision is that the pipeline ends at a draft, not a live post. Everything before the draft is automated. Everything after it is a human deciding whether this is good enough to carry your name.
| Stage | Node in AI Workflow Automation | What it produces | Cloud credit cost |
|---|---|---|---|
| 1. Trigger | Trigger (Manual, WP Event, RSS, Webhook, or a form) | The topic or source item | 0 |
| 2. Research | Research | Web-grounded findings with citations | 40 |
| 3. Draft | Write an Article | A long-form article at your target word count | 3 |
| 4. Illustrate | Media Generator or Unsplash Image | A featured image URL | Varies by model |
| 5. Optimize | Optimize for SEO | The draft rewritten around your keywords | 2 |
| 6. Review | Human Input | An approval or an edited version | 0 |
| 7. Publish | Create Post | A WordPress post, status Draft | 0 |
Credits apply only in Cloud mode. In Local mode every AI node uses your own provider key, so the cost is whatever OpenAI, Anthropic, Google, or Perplexity charges you directly and the plugin takes nothing.
Which content stages are worth automating?
Automate the stages that are mechanical and verifiable. Keep the stages that require judgment about your reader. In practice that means research gathering, first drafts, image sourcing, metadata, and formatting are good candidates, while angle selection, factual sign-off, and anything involving a client or a claim about your product are not.
The stages I automate without hesitation:
- Source gathering. Pulling recent, cited material on a topic is tedious and machine-checkable.
- First-draft structure. Getting from blank page to an organized 1,000 words is where AI genuinely saves hours.
- Featured images. A generated or stock image is a five-second decision, not a creative one.
- Keyword integration. Working target terms into existing prose is mechanical editing.
- Category, tag, and author assignment. Rules-based, every time.
The stages I never fully automate: choosing what to write about, verifying every factual claim, and the final publish action. Google’s own guidance on generative AI content tells you to “focus on accuracy, quality, and relevance, especially when automatically generating the content,” and warns that using generative AI “to generate many pages without adding value for users may violate Google’s spam policy on scaled content abuse.” A human gate is the cheapest insurance against that.
How do you automate research and outlining?
Research automation in AI Workflow Automation runs through the Research node, which queries Perplexity’s Sonar models against the live web rather than a model’s training data. That distinction matters: a normal chat model invents plausible sources, while the Research node returns findings with citations attached.
- Drag a Research node onto the canvas from the AI Actions group.
- Type your research query, or reference the trigger with a variable tag such as
[[topic] from trigger-1]. - Pick a Model: Sonar for quick lookups, Sonar Pro for depth, Sonar Reasoning or Sonar Reasoning Pro for multi-step questions, Sonar Deep Research for long investigations.
- Set Search Recency to Past week or Past month when the topic moves fast, or leave it at Any time for evergreen subjects.
- Add Domain Filters to restrict research to sources you trust, for example your industry’s standards bodies.
- Leave Include Citations on so the downstream draft can reference real sources.
The node’s output is available downstream as [Input from research-1]. Feed it into an AI Model node with a prompt like “turn these findings into an H2 outline of six sections” if you want a separate outlining step, or hand it straight to the writer. Details are in the Research node documentation.
Honest limitation: research grounding reduces fabrication, it does not eliminate it. I still read the citations before a draft goes anywhere near publish.
How do you keep AI drafts in your brand voice?
Brand voice in AI Workflow Automation lives in the Writing Style field of the Write an Article node, and in the specificity of what you feed the node. Vague instructions produce the flat, hedge-everything register that readers now recognize instantly as machine-written.
- Add a Write an Article node and connect the research output into its Content field.
- Set Word Count. The default is 1,000. Longer is not automatically better; pick the length the topic deserves.
- Fill in Writing Style with concrete constraints, not adjectives. “Second person, short paragraphs, no rhetorical questions, name specific numbers, never use the word leverage” beats “professional and engaging.”
- Include two or three sentences of your actual published writing in the Content field as a style sample. This does more for voice than any instruction.
- Reference the draft downstream with
[Input from writeArticle-1].
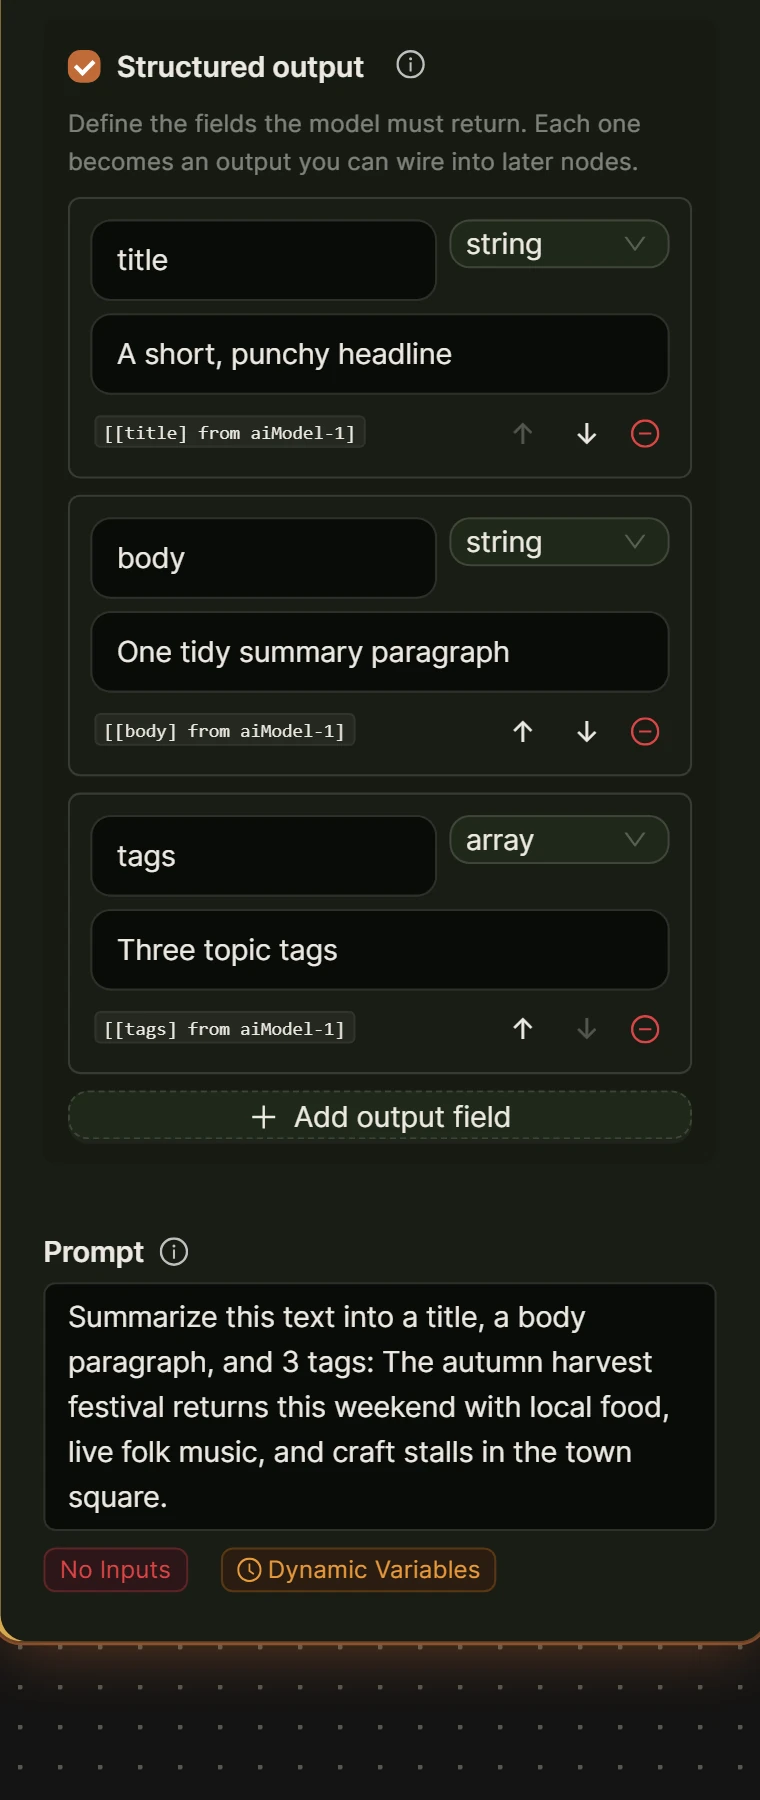
For pieces where you need the output split into fields rather than one block of prose, use an AI Model node with structured output turned on. It returns named fields such as title, body, and tags that you can map individually into the Create Post node.
The full option list is in the Write Article node documentation.
How do you add images and SEO in the same workflow?
Images and SEO are two more nodes on the same canvas, so the article never leaves the workflow to get illustrated or optimized. The Media Generator node produces an original image from a prompt, the Unsplash Image node fetches a stock photo, and the Optimize for SEO node rewrites the finished draft around your target keywords.
- Add a Media Generator node and prompt it with a description derived from the article, for example “editorial illustration for an article titled
[[title] from aiModel-1], flat vector style, no text.” - Or add an Unsplash Image node when a real photograph suits the piece better and you want zero generation cost.
- Add an Optimize for SEO node. Put the draft into Content to Optimize and your terms into SEO Keywords (comma-separated).
- Reference the optimized text downstream as
[Input from optimizeSEO-1]. - In the Create Post node, map the image URL into the Media field so the post gets a featured image automatically.
Run the SEO pass last, as a finishing edit on a finished draft. Running it before the article exists just gives you keyword-stuffed scaffolding. The Optimize SEO node documentation covers the field behavior in detail.
Where should the human review gate go?
A human review gate is required, not optional, and it belongs immediately before the publish step. In AI Workflow Automation the Human Input node pauses the workflow, assigns the item to a person or a role, and waits. Nothing downstream runs until someone acts.
- Add a Human Input node between the last AI node and the Create Post node.
- Set Input Type to Approval Required for a simple yes or no, or Modification Required when you expect the reviewer to edit the text.
- Use Assign to User for a named editor, or Assign to Role so anyone with that role can pick the item up.
- Write clear Instructions. “Check every statistic against the cited source” is a usable brief; “review this” is not.
- Downstream, reference
[[Approved Content] from humanInput-1]or[[Modified Content] from humanInput-1]so the edited version, not the raw draft, is what gets published.
Reviewers work the queue from the My Tasks page in the WordPress admin menu. Even with a gate in place, I still set the Create Post node’s Post Status to Draft. Two safety nets cost nothing and have saved me twice. More on the node in the Human Input documentation.
What does a full example workflow look like?
Here is a complete weekly pipeline that turns one topic into a reviewable draft. It uses seven nodes and takes about twenty minutes to build the first time.
- Trigger set to Manual for testing, switched to a schedule once it works.
- Research node, model Sonar Pro, Search Recency set to Past month, citations on.
- Write an Article node, Content fed from
[Input from research-1], Word Count 1400, Writing Style holding your voice rules and a real sample. - AI Model node with structured output on, prompted to return a title, a meta description under 155 characters, and three tags from the draft.
- Media Generator node producing a featured image from the generated title.
- Optimize for SEO node, Content to Optimize fed from the draft, keywords from your plan.
- Human Input node set to Modification Required, assigned to your editor role.
- Create Post node: Post Type post, Post Status Draft, title from the AI Model node, content from the Human Input node, Media set to the generated image URL, Categories assigned.
Run it once end to end from the builder before you schedule it. The first run always exposes one field you mapped to the wrong node. More worked examples live on the content creation hub.
Frequently asked questions about AI content automation in WordPress
Can AI write and publish a WordPress post automatically?
Technically yes, and I recommend against it. AI Workflow Automation can run research, drafting, imagery, SEO, and posting in one unattended workflow, but the Create Post node should be set to Draft so a person approves the piece. Fully unattended publishing is how sites accumulate wrong facts and thin pages that Google treats as scaled content abuse.
Will Google penalize AI-generated content on my WordPress site?
Not for using AI. Google’s guidance says to focus on accuracy, quality, and relevance however content is produced. What Google does act on is scaled content abuse, which it defines as generating many pages primarily to manipulate rankings rather than help users. Original, reviewed, genuinely useful AI-assisted content is not in that category.
How much does an automated content workflow cost to run?
In Local mode it costs only what your AI provider charges, because AI Workflow Automation uses your own API keys and adds no fee. In Cloud mode the pipeline described here costs roughly 45 credits per article: 40 for the Research node, 3 for Write an Article, and 2 for Optimize for SEO. Triggers, Human Input, and Create Post cost nothing.
Do I need a separate SEO plugin if the workflow optimizes content?
Yes, they do different jobs. The Optimize for SEO node edits the article text around your target keywords. An SEO plugin such as Yoast or Rank Math handles sitemaps, canonical tags, schema output, and the meta fields the theme renders. Run both: the workflow writes optimized copy, the SEO plugin publishes the technical signals around it.
Build your first content pipeline
Start with three nodes, not eight. A Trigger, a Write an Article node, and a Create Post node set to Draft will show you the shape of the thing in ten minutes, and every later stage slots into the middle. Install AI Workflow Automation from the WordPress plugin directory, then try the live content generator demo to see the output quality before you build anything.