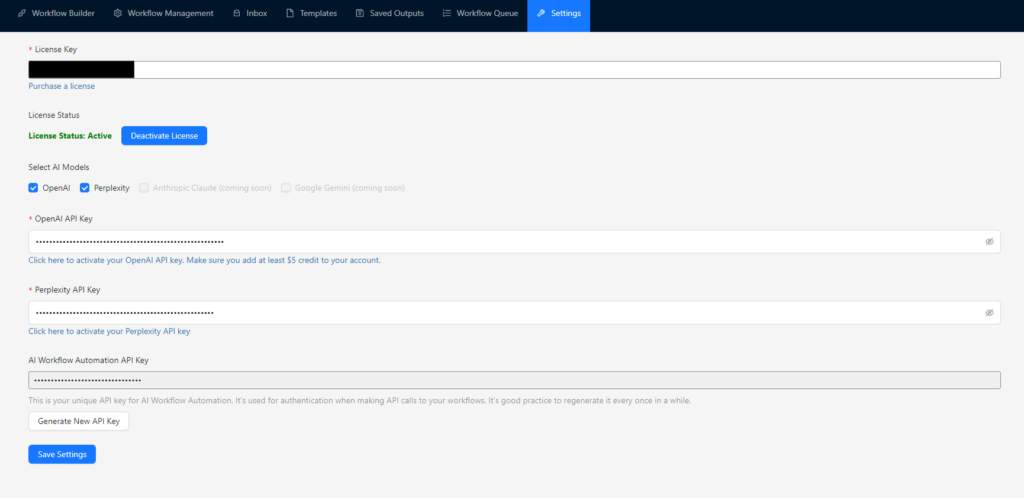
Important: Before activating AI Workflow Automation Pro, make sure to deactivate AI Workflow Automation Lite if you have that one installed. Otherwise the Pro version cannot be activated. Your workflows, data, executions and all the other data will be carried over to Pro automatically.
Once installed and activated, follow these steps to set up AI Workflow Automation:
- API Keys Setup:
- In the AI Workflows > Settings page, locate the API configuration section.
- Enter your OpenAI API key.
- If you plan to use Perplexity AI, enter your Perplexity API key as well.
- Click “Save Changes” to store your API settings.
- Select AI Models:
- In the same settings page, you’ll find a section to choose which AI models you want to use.
- Select the models that best fit your needs (e.g., OpenAI’s GPT models, Perplexity AI models).
- Remember, you need the corresponding API key for each selected model.
- Generate the AI Workflow Automation API Key
- Verify Installation:
- Navigate to AI Workflows > Workflows in your admin menu.
- If you see the workflow management interface, your installation is successful.

After completing these steps, AI Workflow Automation is ready to use. You can now start creating your first workflow or explore the various features of the plugin.
Remember to check our documentation regularly for updates and new features. If you encounter any issues during installation or setup, please refer to our Troubleshooting section or contact our support team.


