Overview #
The Multimedia Generator Node brings powerful AI-powered image and video generation capabilities to your WordPress workflows. Create stunning visuals directly within your site by leveraging Fal.ai’s state-of-the-art AI models. Whether you need to generate custom images from text descriptions, animate still images, or create videos from scratch, the Multimedia Generator Node provides an intuitive interface to accomplish these tasks without requiring any technical expertise.
With this node, you can enhance your content, automate visual asset creation, and integrate AI-generated media throughout your WordPress site—all within your existing workflows.
Key Features #
Three Generation Types #
- Text to Image: Convert descriptive text prompts into high-quality images
- Image to Video: Transform static images into dynamic, animated videos
- Text to Video: Create entirely new videos directly from text descriptions
Professional-Grade AI Models #
- Access to a curated selection of industry-leading AI models including:
- HiDream I1 Fast
- Ideogram V2
- Flux.1 DEV
- Sana Sprint
- Veo 2
- Kling V2 Master
Complete Customization Options #
- Detailed Prompting: Fine-tune your results with detailed positive and negative prompts
- Video Settings: Control duration (5-8 seconds) and aspect ratio (16:9, 9:16, 1:1)
- Image Upload: Easily upload local images for animation or use image URLs
- Cost Estimation: See estimated costs before generating any media
Seamless Workflow Integration #
- Connect to other nodes in your workflow
- Use inputs from previous nodes (like form data or API results)
- Pass generated media URLs to subsequent nodes for further processing
Using the Multimedia Generator Node #
Basic Setup #
- Add the Node: Drag the Multimedia Generator Node into your workflow
- Name Your Node: Give it a descriptive name for easy reference
- Select Generation Type: Choose between Text to Image, Image to Video, or Text to Video
- Choose a Model: Select the appropriate AI model for your needs
- Configure Settings: Add prompts and adjust settings specific to your chosen generation type
- Generate Media: Click the generation button to create your image or video
- Use the Results: Connect the output to other nodes or access the media URL
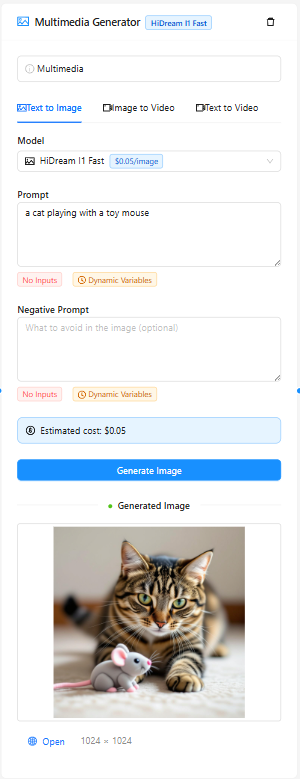
Text to Image Generation #
The Text to Image tab allows you to create images from descriptive text prompts.
Required Settings #
- Model Selection: Choose from models like HiDream I1 Fast, Ideogram V2, Flux.1 DEV, or Sana Sprint
- Prompt: Detailed description of the image you want to generate
Optional Settings #
- Negative Prompt: Describe elements you want to avoid in the generated image
Best Practices for Text to Image #
- Be Specific: Include details about style, lighting, composition, and subject matter
- Use Visual Language: Describe textures, colors, and spatial relationships
- Mention Artistic Influences: Reference artists or art styles for more targeted results
- Balance Detail: Too much detail can confuse the model, while too little leaves too much to chance
- Experiment with Models: Different models excel at different visual styles
Example Prompt:
A serene Japanese garden with a small wooden bridge over a koi pond, cherry blossoms falling gently, warm afternoon light creating long shadows, 4K detailed photography
Example Negative Prompt:
blurry, distorted, low quality, unrealistic, text, watermarks, signatures
Image to Video Generation #
The Image to Video tab lets you animate existing images, bringing still pictures to life.
Required Settings #
- Model Selection: Choose from models like Veo 2 or Kling V2 Master
- Input Image: Upload an image or provide an image URL
- Video Settings: Select duration and aspect ratio
Optional Settings #
- Motion Prompt: Describe how you want the image to animate (recommended for best results)
Best Practices for Image to Video #
- Choose Clear Images: Start with high-quality, well-composed images
- Consider Motion Flow: Think about how elements in your image could naturally move
- Guide the Animation: Use the motion prompt to specify direction and style of movement
- Match Duration to Complexity: Simpler animations work better with shorter durations
- Test Different Aspect Ratios: The ‘auto’ setting preserves your original image’s ratio
Example Motion Prompt:
Gentle camera zoom in, leaves rustling in a light breeze, water rippling
Text to Video Generation #
The Text to Video tab enables you to create videos directly from text descriptions without needing a source image.
Required Settings #
- Model Selection: Choose from models like Veo 2 or Kling V2 Master
- Prompt: Detailed description of the video you want to generate
- Video Settings: Select duration and aspect ratio
Best Practices for Text to Video #
- Describe Dynamic Elements: Focus on movement, transitions, and action
- Establish Scene Setting: Begin with the environment and lighting
- Include Timeframes: Mention if the scene changes over time
- Specify Camera Movement: Include terms like “pan,” “zoom,” or “tracking shot”
- Keep It Coherent: Focus on a single scene or concept for better results
Example Prompt:
Aerial footage slowly panning over a snow-capped mountain range at sunset, golden light casting long shadows, clouds moving gently across the peaks, cinematic quality
Technical Setup #
API Key Configuration #
Before using the Multimedia Generator Node, you’ll need to configure your Fal.ai API key:
- Sign up for an account at https://fal.ai/dashboard/keys
- Generate an API key
- In WordPress, go to the WP AI Workflow Automation settings
- Enter your Fal.ai API key in the designated field
Understanding Costs #
The Multimedia Generator Node provides transparent cost estimates before generating any media:
- Text to Image: Costs range from $0.01 to $0.08 per image depending on the model
- Image to Video: Costs range from $1.50 to $2.50+ depending on model and duration
- Text to Video: Costs range from $1.40 to $2.50+ depending on model and duration
Costs are shown before generation so you can make informed decisions.
Advanced Usage #
Connecting with Other Nodes #
The Multimedia Generator Node becomes even more powerful when connected to other nodes in your workflow:
- Form Node → Multimedia Generator: Use user-submitted descriptions to generate custom images
- API Node → Multimedia Generator: Use data from external sources to inform your image generation
- Multimedia Generator → Email Node: Send generated media directly to users
- Multimedia Generator → WordPress Post Node: Automatically add generated media to posts
Using Dynamic Tags #
You can incorporate data from other nodes in your workflow using input tags:
A [[product-node:color]] [[product-node:name]] on a clean white background, product photography style
This example would use the “color” and “name” values from a node named “product-node” to customize the prompt.
Batch Processing #
For more advanced workflows, you can:
- Use a Loop Node to iterate through a list of descriptions
- Connect to the Multimedia Generator Node
- Generate multiple images or videos in sequence
- Process the results with subsequent nodes
Practical Use Cases #
The Multimedia Generator Node can be used in countless ways:
- E-commerce: Generate product images from descriptions
- Real Estate: Create video walkthroughs from property photos
- Content Marketing: Illustrate blog posts with custom visuals
- Social Media: Automate creation of engaging visual content
- Event Promotion: Generate themed graphics for upcoming events
- Educational Content: Create explanatory visuals from lesson content
- Web Design: Generate background elements and decorative graphics
- User Engagement: Create personalized media based on user preferences
Best Practices #
For Better Results #
- Iterate on Your Prompts: Refine your descriptions based on initial results
- Combine Generation Types: Create an image with Text to Image, then animate it with Image to Video
- Consider Image Composition: For Image to Video, choose images with clear subjects and space for movement
- Save Successful Prompts: Keep a library of prompts that produce good results
For Efficient Usage #
- Optimize for Quality vs. Cost: Choose models based on your quality needs and budget
- Reuse Generated Media: Store and categorize your outputs for future use
- Schedule Generation: For larger batches, schedule workflows during off-peak hours
For Responsible Use #
- Respect Copyright: Don’t generate images that closely mimic specific copyrighted works
- Use Appropriate Content: Avoid generating offensive, misleading, or inappropriate content
- Disclose AI Generation: When appropriate, let your audience know when content is AI-generated
Troubleshooting #
Common issues and their solutions:
Media Not Generating #
- Check API Key: Verify your Fal.ai API key is correct and active
- Review Prompts: Ensure your prompts don’t contain prohibited content
- Check Connection: Verify your site can connect to external services
- Model Availability: Some models may be temporarily unavailable
Poor Quality Results #
- Refine Prompts: Be more specific in your descriptions
- Try Different Models: Switch to a different model that may better suit your needs
- Use Negative Prompts: Specify what you don’t want to see in the output
- Check Input Images: For Image to Video, ensure source images are high quality
Processing Time Issues #
- Select Faster Models: Some models process more quickly than others
- Simplify Requests: Complex prompts may take longer to process
- Optimize Workflow: Reduce unnecessary nodes in your workflow
- Check Server Resources: Ensure your server has adequate resources
Technical Details #
The Multimedia Generator Node uses advanced AI technologies:
- Diffusion Models: State-of-the-art image generation AI
- Motion Synthesis: Advanced algorithms for natural movement
- Video Rendering: High-quality video encoding
- Secure Processing: All media generation happens via secure API
Conclusion #
The Multimedia Generator Node brings powerful AI-generated visual content creation directly into your WordPress workflow system. By following the guidelines in this documentation, you can create stunning images and videos that enhance your content, engage your audience, and save valuable time in your creative process.
For additional support, check out our video tutorials, join our community forum, or contact our support team.


